Tiny Home Construction Plumbing: A Beginners Guide for DIY Enthusiasts
Hey there, fellow tiny home enthusiasts! Today, we’re diving into the world of tiny home construction plumbing. As someone who’s been through the process myself, I know firsthand how daunting it can be to navigate this crucial aspect of building your dream tiny home. But don’t worry; I’m here to share my knowledge and experience to help make your journey a little smoother.
The Importance of Efficient Tiny House Plumbing
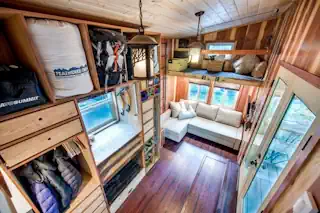
In a tiny home, every square inch counts. That’s why efficient plumbing is absolutely essential. Not only does it help you make the most of your limited space, but it also ensures that your home is comfortable, functional, and compliant with local building codes. Trust me; you don’t want to overlook this critical component of your tiny home construction.
Factors to Consider in Tiny Home Plumbing Design
When designing your tiny home’s plumbing system, there are a few key factors to keep in mind:
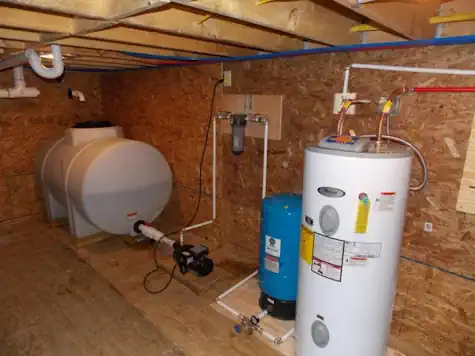
Space-saving fixtures and layouts: Opt for compact, multi-functional fixtures like combining a tiny house shower and toilet, or a kitchen sink that doubles as a bathroom sink. Get creative with your layout to maximize every inch of your tiny home. Tankless water heaters are a great option to save precious space and provide unlimited hot water without a hot water heater.
Water and energy conservation strategies: Incorporate water-saving features like low-flow fixtures and greywater systems to reduce your environmental impact and lower your utility bills. Collecting water in a water tank and then filtering and adding to your freshwater tank is just one of many tiny house plumbing options to be considered.
Meeting local building codes: Before you start any plumbing work, make sure you’re familiar with your local building codes and regulations. This will save you a lot of headaches down the road. This may take a little research if you are building in an area that is different from the intended placement of your future tiny house.
Pressure Systems for Water: Decide how your water will be pressurized within your tiny home. Whether you’re connecting to a city water supply that naturally provides pressure, or relying on water tanks and pumps for off-grid living, ensuring consistent water pressure is key. This requires not just the right equipment but also thoughtful planning of your plumbing layout to avoid pressure drops and ensure a steady flow of water to your taps and appliances.
Estimating Electrical Power Needs: Planning your plumbing system also involves considering the electrical power requirements of components like water pumps, heaters, and other plumbing-related appliances. It’s important to calculate these needs accurately to ensure that your tiny home’s electrical system can handle the demand without overloading. This assessment will help you plan an efficient, safe, and reliable plumbing system that harmoniously integrates with your tiny home’s overall energy system.
Remember, balancing functionality with efficiency is key in a tiny home, so take the time to consider energy-efficient appliances that could save space and reduce power consumption.
Navigating Wastewater in Tiny Homes: Grey Water and Black Water Systems
Taking on the challenge of plumbing in your tiny home means considering how to efficiently manage wastewater, which typically divides into greywater and black water. It’s a topic that might not be the most glamorous, but it’s absolutely vital for maintaining a sustainable and hygienic living space.
Understanding Grey Water and Black Water
Grey water is the relatively clean waste water from baths, sinks, washing machines, and other kitchen appliances. With the right treatment, greywater can be repurposed for non-potable uses, like gardening or flushing toilets, significantly reducing your overall water consumption. Incorporating a greywater system into your tiny home not only conserves water but also embraces a sustainable lifestyle, aligning with the tiny home movement’s ethos of minimal environmental impact.
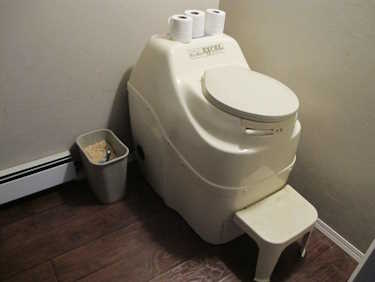
Blackwater, on the other hand, is the wastewater from toilets, containing human wastes. Due to its potential health risks, black water requires careful handling and disposal. For a tiny house toilet, especially those on the move or located off-grid, composting toilets are a popular solution that not only deals with black water safely but also turns it into compost for non-edible plants, closing the loop on waste.
Designing Your Tiny Home Wastewater System
When planning your tiny home’s plumbing, integrating both greywater and blackwater management systems from the outset is crucial. Here are some considerations:
Choose the right systems for your lifestyle: Whether you opt for a composting toilet, a chemical toilet, or a more conventional flushing toilet impacts how you handle black water. Similarly, decide if you’ll treat greywater for reuse or simply dispose of it safely.
Compliance with regulations: Make sure your wastewater management solutions comply with local regulations. Some areas have specific requirements regarding the disposal or treatment of greywater and blackwater, especially for homes not connected to municipal sewer systems.
Space and resource efficiency: In the spirit of tiny living, look for compact, low-tech solutions that do not require extensive space or resources. Simple systems, like a composting toilet, can be surprisingly effective and sustainable.
By thoughtfully integrating greywater and blackwater systems into your tinyhouse plumbing, you not only ensure your home’s functionality and compliance but also contribute to a sustainable lifestyle. Remember, it’s about finding the balance between comfort, ecological responsibility, and practicality.
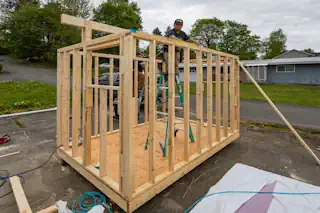
Step-by-Step Guide to DIY Plumbing in Tiny Houses
Now that you’ve got the basics down let’s dive into the nitty-gritty of DIY plumbing for your tiny home:
Planning and mapping the plumbing system: Start by creating a detailed tiny house plumbing diagram of your planned system, including the location of all fixtures, pipes, and connections. This will serve as your roadmap throughout the installation process.
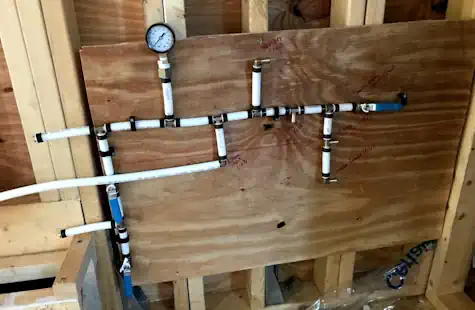
Choosing the right materials and tools: Invest in high-quality, durable materials like PEX piping and brass fittings. Don’t forget essential tools like a pipe cutter, crimping tool, and plumber’s tape.
Installing the plumbing system: Take your time and follow your plan closely. Start with the water supply lines, then move on to the drainage system. Double-check all connections to ensure they’re secure and leak-free.
Testing Water Supply Lines and Drain Lines: Test drain lines with limited amounts of water before sending serious fluids down the drain line. Similarly, check your hot supply and cold water supply line connections with limited pressure before applying full pressure to the system.
Alright, rolling up our sleeves a bit more, we’re going to explore the various types of plumbing piping materials you might consider for your cozy tiny home. Each type has its unique benefits and uses, making it perfect for certain aspects of your plumbing system:
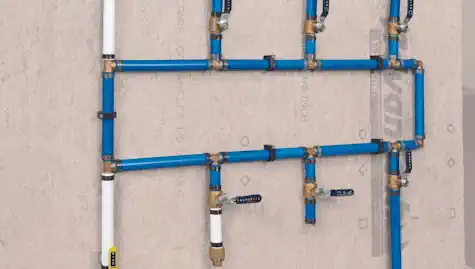
PEX Pipes (Cross-Linked Polyethylene): This flexible, plastic piping is a dream for DIYers due to its ease of installation. It’s ideal for plumbing lines in tight spaces, which, as you can imagine, are pretty common in tiny homes. Plus, it’s resistant to scale and chlorine, does not corrode or develop pinholes, and is less likely to freeze and burst, which is a massive win for any home.
PVC Pipes (Polyvinyl Chloride): Say hello to the hero of drain, waste, and vent lines. PVC piping is lightweight, easy to work with, and affordable, making them a popular choice for the non-pressurized side of things. Just keep in mind that not all local codes allow PVC for all types of uses, so checking in with the regulations is a good call.
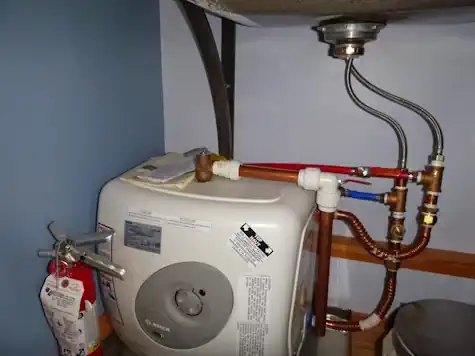
CPVC (Chlorinated Polyvinyl Chloride): Like its cousin PVC, CPVC is used for water lines but with a twist. It can handle higher temperatures, making it suitable for hot and cold water distribution. If your tiny home has a compact hot water system, CPVC could be your go-to.
Copper: This classic material isn’t just for old-school plumbing; it’s perfect for your tiny home’s water lines too. Copper is durable, reliable, and has a proven track record. Though it’s a bit more of a challenge to work with compared to PEX and PVC, and more expensive, its longevity might make it worth the effort for some.
ABS (Acrylonitrile Butadiene Styrene): Another sturdy option for waste, vent lines, and drain pipes especially if you live in a colder climate. ABS is a lot like PVC but tougher and more resistant to cold temperatures. Just remember, like PVC, to check if your local codes are ABS-friendly.
Galvanized Steel: While not as common nowadays for new plumbing installations due to its tendency to corrode over time, galvanized steel pipes were once a staple for water lines. They might still be found in older tiny homes that are being renovated, so it’s good to know about them.
Choosing the right piping material for your tiny home involves balancing cost, durability, and compliance with local building codes. You will need different types of piping material for different aspects of the plumbing job.
For most tiny houses, water supply to bathroom and kitchen sinks. toilets, showers, dishwashers, and washer and dryers are usually done with Pex. Drains for kitchen and bathroom sinks, shower drain, dishwashers, and washers are typically done with PVC unless building codes specify something else. Grey water drainage (i.e. toilets) is typically done with ABS but again building code may have some more specific requirements.
Understanding the Costs of Plumbing Installations in Tiny Houses
Navigating the costs of plumbing installations in a tiny house can seem daunting, but with some insight and preparation, it’s definitely manageable. The total cost can significantly vary depending on several factors including the complexity of your plumbing system, the choice of materials, and whether you’re going for a DIY approach or hiring a professional.
For those who are leaning towards DIY, the bulk of your expenses will be materials and tools. Prices for PEX piping, for example, can be quite friendly on the wallet, especially when compared to copper. A rough estimate for materials might range from $500 to $2,000, depending on the size of your home and the specifics of your setup. Tools necessary for the job, if you don’t already own them, can add another $100 to $300 to your budget.
Here’s a handy breakdown of the tiny house plumbing costs for the various types of plumbing piping materials and connectors you might consider for your tiny home project. Keep in mind that prices can vary based on your location, the current market rate, and where you purchase them:
PEX (Cross-Linked Polyethylene)
Piping: Approximately $0.30 to $2.00 per foot
Connectors and fittings: $5 to $25, depending on the type and size
PVC (Polyvinyl Chloride)
Piping: About $0.50 to $1.50 per foot for 1/2″ to 2″ pipes
Connectors and fittings: $1 to $20, varying with size and specificity
CPVC (Chlorinated Polyvinyl Chloride)
Piping: Roughly $0.50 to $1.00 per foot
Connectors and fittings: $2 to $20, size and type dependent
Copper
Piping: $2 to $4 per foot for Type M copper tubing
Connectors and fittings: $5 to $100, significantly varying with copper material and fitting complexity
ABS (Acrylonitrile Butadiene Styrene)
Piping: Around $0.60 to $1.50 per foot
Connectors and fittings: $1 to $15, depending on the piece and size
Galvanized Steel
Piping: Approximately $4 to $8 per foot
Connectors and fittings: $10 to $50, based on the fitting type and size
Remember, while the upfront cost is a crucial consideration, think about durability, maintenance, and compliance with local building codes as well. Choosing the right materials for your tiny home’s plumbing system is an investment in your future comfort and home’s functionality.
Professional Installation
On the other hand, hiring a professional can significantly increase your costs, with labor rates varying drastically by location and the complexity of your project. Professional installation might set you back anywhere from $1,500 to over $5,000. Remember, though, that hiring a professional can potentially save you from costly mistakes and ensure that your plumbing system complies with local codes and standards.
Choosing water-saving fixtures and appliances can also impact your initial costs but potentially save you money in the long run through lower water usage. It’s also worth considering the long-term durability of your chosen materials, as opting for cheaper options might lead to higher maintenance and replacement costs down the line.
Above all, the key to managing your plumbing installation costs effectively is thorough planning and budgeting. Don’t hesitate to ask for quotes from multiple suppliers and professionals before making your decisions, and always keep a small buffer in your budget for unexpected expenses.
Common Plumbing Mistakes in Tiny Home Construction and How to Avoid Them
Even the most experienced DIY-ers can make mistakes when it comes to tiny home plumbing. Here are a few common pitfalls and how to avoid them:
Underestimating water pressure: Make sure your plumbing system can handle the water pressure in your area. Installing a pressure regulator can help prevent leaks and bursts.
Forgetting to vent the drainage system: Proper ventilation is crucial for preventing clogs and backups. Make sure to include vent stacks in your plumbing design.
Skimping on insulation: Insulating your pipes will help prevent freezing and bursting in cold weather. Don’t cut corners on this important step!
Practicing with the Materials: As silly as it seems, not buying a few extra connections and practicing is a mistake. Many times I have bought materials thinking I had exactly the right pieces only to end up making a bigger mess because I did not practice with the material and the connections.
Tips for Maintaining Your Tiny Home Plumbing System
Once your tiny home plumbing is up and running, it’s important to maintain it properly to avoid any issues down the road. Here are a few tips:
Regularly inspect your pipes and connections for leaks or damage. Inspection implies you left access panels to get to various key areas so you are not cutting out chunks of the wall.
Use a drain snake or natural drain cleaner to prevent clogs. A garbage disposal sounds like a dream but most sewer line clogs are a result of garbage disposal waste. Some food items like pasta are better off in the garbage can instead of in the sewer pipes.
Insulate your pipes before winter to prevent freezing. Everyone talks about freezing but excessive and repetitive high temperatures can make piping brittle. Either direction will shorten the life of the plumbing in your tiny house. Regardless of where you plan to live, insulate your pipes!
Conclusion and Resources for Further Learning
Whew! That was a lot of information, but I hope you found it helpful in your tiny home construction journey. Remember, taking the time to plan and execute your plumbing system carefully will pay off in the long run with a comfortable, efficient, and code-compliant tiny home. Tiny house life, especially if you have a tiny house on wheels, requires a water tight seal on your tiny house plumbing system.
Frequently Asked Questions (FAQ)
Can I use PEX piping for both hot and cold water supplies in my tiny home?
Absolutely! PEX is versatile and can be used for both hot and cold water lines. Its flexibility and resistance to scale and chlorine make it an excellent choice for tiny home plumbing systems. Furthermore, it comes in a variety of colors which makes identification of hot and cold super easy.
Is CPVC a better option than PVC for water supply lines?
CPVC is designed to handle higher temperatures, making it a better option for hot water supply lines compared to PVC. However, PVC is still a great choice for drain, waste, and vent lines due to its lightweight and easy-to-work-with nature.
How can I prevent my pipes from freezing in the winter?
Insulating your pipes is key to preventing them from freezing. Make sure to cover all exposed pipes, particularly those that run through unheated spaces. Additionally, keep a trickle of water running through the pipes during extremely cold spells to prevent freezing.
What should I do if I’m not sure whether a material complies with local building codes?
Always check with your local building department before selecting your tiny house plumbing materials. Building codes can vary significantly from one area to another, and using non-compliant materials could result in having to redo your tiny house plumbing system.
How often should I inspect my tiny home’s plumbing systems?
We recommend inspecting your plumbing systems at least once a year for any signs of leaks, damage, or wear and tear. Regular maintenance and early detection of problems can save you from costly repairs in the future. If you elected to have a more permanent tiny house with a septic system, then annual checks of your sewer system is a must.